How To Create an HTML Email: A Beginner’s Guide
Creating an HTML email can be complicated. Here’s what you need to know to create a professional HTML email.
.png)
.avif)
An HTML email template is a reusable file that outlines the structure and the content of a particular email.
An HTML email template is beneficial for a number of reasons.
First, it saves you significant time. You can use an HTML email template for your marketing campaign, customer service, and other email-related communication activities.
Second, an HTML email template is reusable. You can utilize your existing HTML template rather than create one every time you need to send a new email.
Third, it enhances flexibility. With an HTML email template, you can easily customize your message with attributes like logos, layouts, colors, and typography to match your brand.
Fourth, HTML email templates are usually responsive, allowing your message to display well on devices with different screen configurations.
You can create an HTML email template by coding or using a drag-and-drop tool such as that offered by MailChimp.
Using a drag-and-drop tool is the easiest way of creating an HTML email template since you do not need any programming knowledge.
This tutorial will provide a step-by-step tutorial on how to create an HTML email template using Mailchimp, a top email service provider.
1. Sign up
Mailchimp is a popular marketing platform that allows you to develop HTML email templates quickly. With Mailchimp, you don’t have to worry about the underlying HTML code, inline CSS, div and img tags, or other related concepts since they are handled behind the scenes.
You’ll need a Mailchimp account to create an HTML email template. You can easily sign up or register an account on the official Mailchimp website.
If you already have a Mailchimp account, you can log in and proceed to the next step. Otherwise, open the Mailchimp website in your web browser.
Navigate to the sign-up web page, fill in the required details, and click the sign-up button.

Once you sign up, Mailchimp will send a verification email to the email address you used to register.
Login to your email account, open the Mailchimp email, and click the Activate Account button.

The link will direct you to an account setup page, where you will need to choose your preferred pricing plan. For this tutorial, select the Free pricing plan, scroll to the bottom, and click the Next button.

You’ll need to provide more personal details in the subsequent pages to complete setting up your account.
Add your first name, last name, business name, and phone number, then click the Next button.

By default, Mailchimp assumes you have a business and, therefore, requires a business address. You can use your home address if you don’t have a physical business location.

Once you’ve added your personal details, you’ll need to answer several questions (including how many subscribers you have, how you intend to use Mailchimp’s services, and how you sell to your clients) to complete the account setup process.
2. Go to the Dashboard
You should see the following page after completing the setup process.

Click the Let’s Go button to navigate to the Mailchimp dashboard.
Your Mailchimp dashboard page should appear as follows.

3. Click Campaigns
To create an email template, click the Campaigns dropdown item on the left navigation menu.
A submenu window will appear showing All campaigns, Email templates, Email analytics, and Reports.
Click Email templates to proceed, as demonstrated below.

4. Click Create Template
By now, you should have the following page on your computer.

Click the Create Template button to proceed to the layouts window.
5. Choose a layout
It’s time to choose a layout for your email template. Mailchimp offers several layouts to perform actions, such as making announcements, educating target audiences, and selling products.
In this case, we will go with the Sell Products layout by clicking its tab on the layouts page.
You’ll be directed to an edit page where you can use Mailchimp’s drag-and-drop tool to customize the layout.

6. Create the HTML email template structure and header
Currently, the email template looks like the image below.

Since we are using an existing layout, the template already has a proper structure in place. For instance, the header component will have the logo, the body section will contain your product images and description, and the footer section will display business contact details and social media icons.
Let’s customize your header component by adding a logo.
At the top of the template, click the box named Logo. A new window will appear on the right side that allows you to edit the logo.
Be sure to replace the existing image with that of your brand. Press on the Replace button to proceed.

When you click the Replace button, the page below will load all the images in your project.
Currently, you don't have any images in our working directory. You can import pictures and other graphics files from your computer by pressing the Upload button, as demonstrated below.

The image you selected will be added to the logo box automatically.
As shown below, you can adjust the image size using the slider in the adjacent window.

7. Create the body and content area
It’s time to add images and content to the email body section.
First, add a primary image to capture the user’s attention. This can be a picture of your main product. In this tutorial, we will use pictures of shoes.
Click the shoe icon box and press the Replace button.

Let’s add some content to describe the product.
Click the block of text at the bottom of the primary image to access the text editor.

You should replace the text in your email editor with content that reflects your brand. As an example, we’ve used the following text.
“Here is our top product.
People love this shoe because it's comfortable, water-resistant, and long lasting.
The shoe is available for men, women, and children in a number of different colors.”
The editor allows us to format our text. For instance, we can change the text color and underline certain words, among other functions.

Repeat this process to complete the feature section on the template. For example, the feature section below has been completed by importing two product images and adding them to the template. The product title and description texts have also been modified.

8. Modify the call-to-action button
Your template already has a call-to-action button. However, you need to modify it to make the button functional.
Specifically, you should add new text and a web address. Specify what the link directs to (this can be an email address, an external site, or your website).
Click the button component. As illustrated below, an editor window will open on the right side to make changes.

You can change your buttons’ colors, corners, fonts, and borders in the Style tab.

9. Create the footer
A footer is usually located at the bottom of a page and commonly contains details like contact information, social media links, and subscription details. It's important to add an unsubscribe button in the footer that users can use to opt out of email campaigns. Many jurisdictions, including the US, Canada, and the EU, have made this a legal requirement for many email campaigns.
Let’s add some social media details to your HTML email template.
Navigate to the bottom of the HTML template and drag and drop the footer component from the Blocks tabs, as illustrated below.
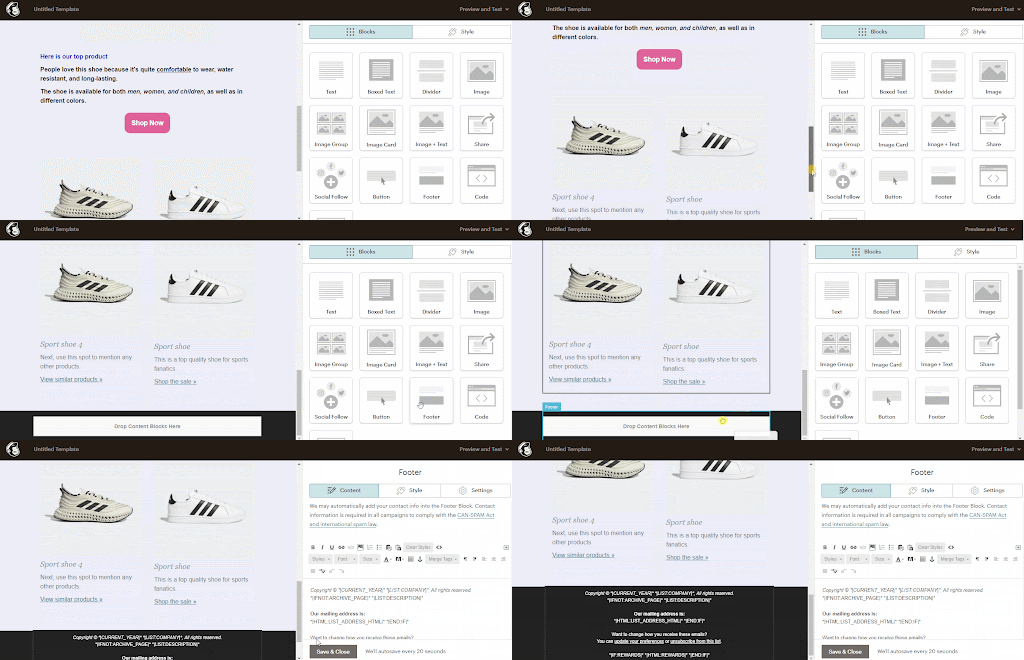
The footer has default content, including a mailing address, subscription details, and copyright information. Once again, you can modify these details to reflect your brand using the editor window.
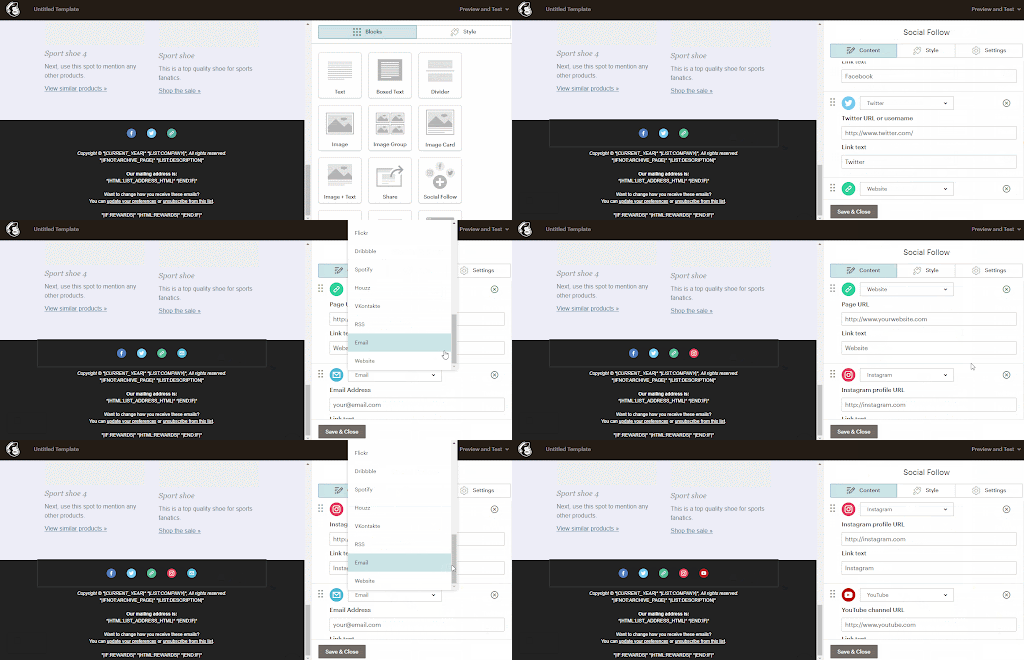
To add social icons, find the Social Follow component from the Blocks tabs and drag and drop it in the footer section.

You can add several social media icons to your template. For instance, add YouTube and Instagram icons by clicking the Social Follow component we’ve just added above.
An editor window will pop up on the right. Scroll down the window and locate the Add Another Service button.
Click the Add Another Service icon to access the social media icons list, as shown below.
Note: You must repeat the same process if you want to add several platforms.
10. Style the template footer
You can customize the footer component with a different background color or image using Mailchimp’s email design editor.
To get started, move your mouse to the footer section and hover over it.
A white rectangular box will pop up with Color and Image options. You can set a new color or image as the footer’s background by choosing the Color or Image options.

11. Run tests
Now that you’ve created and styled your template, you’ll need to test it to see how it will appear on different devices.
Running tests is essential because it helps identify bugs, styling errors, and unresponsive components that you can correct to deliver an excellent user experience.
Mailchimp allows you to preview how the template appears on desktop and mobile devices. You can also view how the template will display in the inbox of different email clients (e.g., Microsoft Outlook, Gmail, and Yahoo), but you must upgrade your account to access this functionality.
Access the preview window by clicking on the Preview and Test button on the top right of the navigation menu. A sub-menu will appear with two options: Enter preview mode or Send a test email.
Choose the Enter preview mode item to proceed.
You will be directed to a new page to view how the template looks on both desktop and mobile devices.

From the above tests, we have achieved our goal of creating a responsive HTML email template. The template adjusts perfectly to different screen sizes.
You can also send yourself an email to test things further.

Need a little help? Head over to Project Catalog™ from Upwork
Creating an HTML email template from scratch can be overwhelming, especially for beginners. You need to know how to code and understand concepts like HTML tags, web design, media queries, HTML files, and JavaScript.
Fortunately, you can use numerous drag-and-drop tools like Mailchimp to create a simple yet engaging HTML email template. If you need more help, or if you need to create a truly customized HTML email, you can find hundreds of web developers, email marketing experts, and designers on Upwork, the world’s human and AI-powered work marketplace.
For professionals looking for work, Upwork is the best place to get started. You can sell your services and meet prospective clients on Upwork today.
Upwork is not affiliated with and does not sponsor or endorse any of the tools or services discussed in this article. These tools and services are provided only as potential options, and each reader and company should take the time needed to adequately analyze and determine the tools or services that would best fit their specific needs and situation.
This article is intended for educational purposes and should not be viewed as legal or tax advice. Please consult a professional to find the solution that best fits your situation.

.avif)

Author Spotlight

Upwork is the world’s largest human and AI-powered work marketplace that connects businesses with independent talent from across the globe. We serve everyone from one-person startups to large organizations with a powerful, trust-driven platform that enables companies and talent to work together in new ways that unlock their potential.