How To Use Photoshop's Generative Fill Tool
Discover how Photoshop's Generative Fill Tool can transform your editing workflow. Uncover its capabilities and ease your photo retouching process.

.png)
.avif)
When it comes to editing and enhancing images, Adobe Photoshop has long been an industry-standard software due to its advanced features. It lets users create complex compositions, edit images, and add filters and effects like sharpening, blurring, distorting, and color-correcting. Plus, you can add text and create digital illustrations with built-in painting tools to create images that match your needs.
The introduction of Photoshop’s Generative Fill tool takes things a notch higher. With just a few prompts, you can edit and transform your images in Adobe Photoshop.
This tool lets you add, extend, and remove objects in your content. Whether you wish to add objects, natural landscapes, people, or anything from your imagination, you can do it with Photoshop’s Generative Fill.
Integrating Adobe Photoshop’s Generative Fill tool into photo editing and graphic design tasks can save you time and inspire your creativity. In this step-by-step tutorial, we help you learn how to use the Generative Fill tool to enhance your workflow.
Understanding generative AI in Photoshop
Generative AI is a form of artificial intelligence that can produce different types of content, including text, images, videos, code, audio, and synthetic data. It’s powered by advanced natural language processing technology, machine learning algorithms, deep learning models, and neural networks.
Generative AI is trained on vast amounts of data, allowing it to perform certain actions autonomously. NLP technology enables these systems to process and interpret human inputs and generate meaningful and coherent responses.
Photoshop’s Generative Fill tool differs from other in-app AI features because it accepts user inputs or prompts. For instance, a user can enter a prompt such as “a red house near a lake.” The tool will then process this input and generate multiple variations. The user can then review these variations and determine the best one for their use case.
One of Adobe’s first entries into artificial intelligence was with Adobe Firefly, a standalone platform launched in early 2023 that accepts user inputs, processes them, and returns relevant outputs. This web-based app allows individuals to create entirely new images from text prompts, apply color variations to artworks, add styles and effects to text, and generate images from 3D objects.
Generative Fill was introduced just months later to add AI-powered generative capabilities to different Adobe beta apps, including Photoshop. With this tool, it’s possible to highlight any area of your image and write short prompts to transform it.
Installing and setting up Adobe Photoshop
Before installing Adobe Photoshop, ensure that your computer system meets the following minimum requirements.
For Windows users, the computer should have:
- At least a 2 GHZ or faster processor
- Windows 10 64-bit or later
- 8 GB RAM or higher
- 1.5 GB of GPU memory
- A monitor resolution of 1200 by 800 or greater
- At least 20 GB of free space on your hard disk
For macOS users, you need at least:
- Multicore Intel or Apple Silicon with a 2 GHZ processor. It should also support 64-bit.
- macOS Big Sur or later
- 8 GB RAM
- 1.5 GB OF GPU memory
- A monitor with a resolution of 1200 by 800 or greater
- 20 GB of free space on the hard disk
If you’re using an iPad device, it needs iPadOS 16 or later. A second generation Apple Pencil is also preferred.
To get Photoshop, you need to first download the Adobe Creative Cloud app from the official Adobe website, shown below.

Once you’ve installed the Adobe Creative Cloud app, launch it and sign in using your Adobe account. On successful authentication, you’re directed to the main dashboard where you can access all the apps.

Next, find the Photoshop app and click the Install button to add it to your computer. Note the installation may take some time depending on your computer and internet connection.
Note: The Generative Fill feature is only available in the latest version or Photoshop Beta. If you had installed Photoshop in the past, consider upgrading to access the Generative Fill feature.
If the installation is successful, the Generative Fill contextual task bar will appear at the bottom of an image when you open Adobe Photoshop, as shown below.

Clicking the three dots on the contextual taskbar gives you the option to hide, reset, or pin the taskbar’s position.
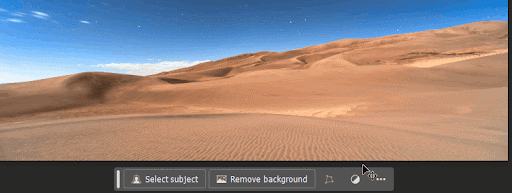
From the toolbar, you can also mark and remove the background from an image. When you click the Select subject, it allows you to select an area on the image where you wish to add an object using the Generative Fill tool.
How to use Generative Fill in Photoshop
From selecting an image to adding new objects to it, here are the steps for working with the Generative Fill tool in Photoshop.
Note: In this tutorial, we’ll use this royalty-free image we’ve downloaded onto our computer.
1. Select an image
Before using the Generative Fill tool, you first have to import the image you wish to edit into the Photoshop workspace.
To do this, click File on the main taskbar and then Open. This will direct you to various directories on your computer.
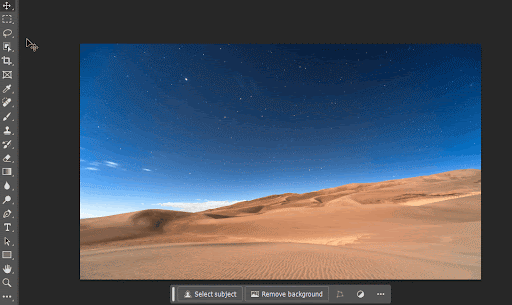
Navigate to the folder with your image and then open it in Adobe Photoshop. Your workspace should appear as shown below.

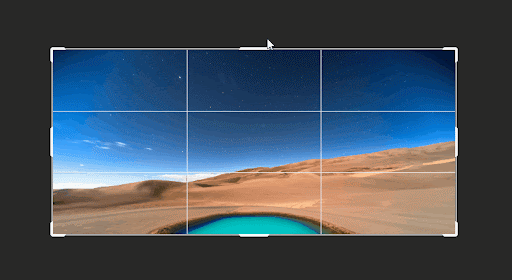
2. Identify an object or area in your image
Now that you’ve imported the image you want to work with, the next step is to identify the areas you wish to modify on your image.
You can select an area on your image using selection tools like the Lasso tool and the Rectangular Marquee tool, highlighted below.
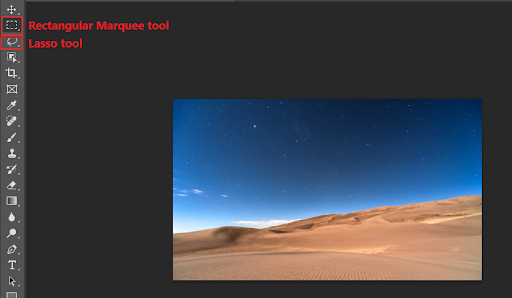
In our case, we’ll use the Lasso tool to map an area on the image where we want to add an oasis.
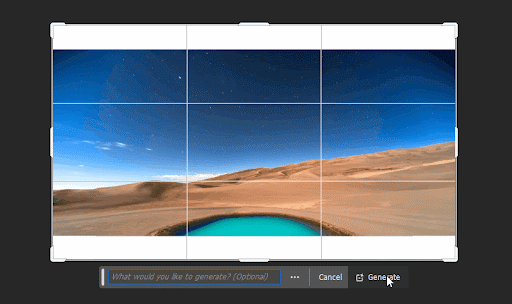
3. Click the Generative Fill button
With the area mapped, we can generate a new layer. To get started, click the Generate Fill button.

4. Use a prompt or automatic fill
When you click the Generative Fill button, an input field will become visible. You can write a descriptive prompt inside this field or leave it black to facilitate an automatic fill based on surroundings.
Prompts in Photoshop are direct and straight to the point. For instance, there’s no use for terms like “create,” “write,” and “build.”
In our case, we wrote the prompt “an oasis with blue water” rather than “create an oasis with blue water.”
You also don’t have to specify the image quality or camera angle in prompts like you do in Midjourney. Photoshop will automatically analyze your original image and ensure the generated object fits.

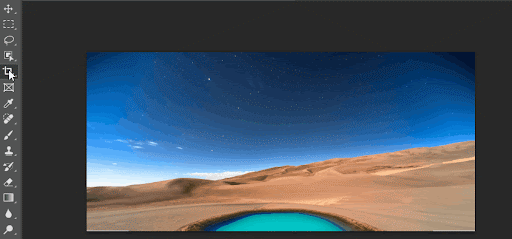
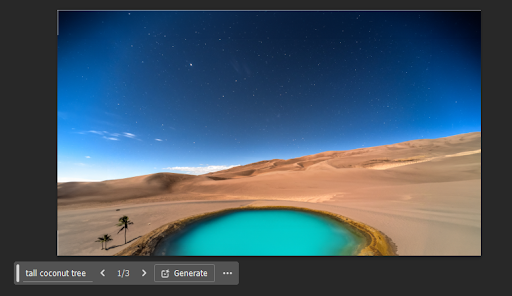
5. Click Generate to view
Once you have written a prompt, click the Generate button to initiate the object generation process.

The object generation process will take some time depending on your computer and internet connection.
But once it’s done, you’ll have a new generative layer with an output close to what you requested in your prompt. In our case, the following AI-generated oasis was added to the image.

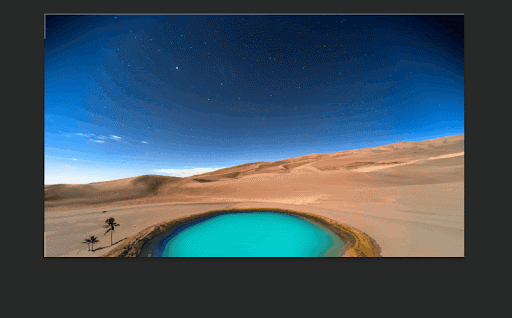
Whenever you generate a new object, Photoshop’s Generative AI tool will produce three variations. You can review these objects and determine the best one for your use case.
To illustrate, the Generative Fill tool generated the following variations of an oasis.

Exploring the properties and options
The Generative Fill feature provides several other options and properties to edit your video. Here are some of the popular options.
Expanding canvas
Adobe Photoshop’s Generative Fill feature can analyze your current image and then expand or increase the size of your image based on the contents.
To get started, navigate to the crop tool and click on it to highlight your image.
Next, long press the alt key (for Windows users) or options key (for Mac users), and use the cursor to crop the image toward the direction you want to extend. In our case, we wish to extend the height of the image. So, we’ll do it as follows.
Once you’ve mapped the image area you want to extend, leave the Generate Fill input field empty and then click the Generate button.
The Generative Fill tool will automatically scan the image and then fill the empty areas. Once again, it generates three variations of the extended image.

Changing style
The Generative Fill tool allows you to generate content in different styles. For instance, you can add realistic, anime, or cartoon objects to your image.
In our case, we chose to add a realistic coconut tree to the image.
Removing content
You can also use the Generative Fill tool to remove objects from your image. To do this, you use the Lasso tool to mark the object you wish to remove, then leave the prompt field empty and click the Generate button.
To demonstrate, we will remove the palm trees we added in the previous section, as shown below.
As demonstrated above, the Generative Fill tool removed the coconut trees from our image and filled the selected area based on the surroundings.
Advanced usage and tips
Adobe Photoshop’s Generative Fill tool can be integrated into your workflow to streamline different editing tasks. For starters, it can remove unwanted objects from an image. It can also extend the size of an image by generating a new background that integrates seamlessly with the existing one.
The Generative Fill tool is also helpful in modifying various objects. For example, you can use it to remove cracks on walls, smooth uneven surfaces, or “repair” torn clothes. Individuals can also save time and enhance their creativity by using the Generative Fill tool to create entirely new objects and use them in their artwork.
Adobe Stock features high-quality and royalty-free content, which includes images, vector graphics, and illustrations. When working with the Generative Fill tool, such content on Adobe Stock can be a source of inspiration that enhances your work.
Adobe Stock images can also serve as a reference point, enabling the Generative Fill tool to produce similar content. Other Adobe apps you can use to access AI-powered functionalities include Adobe FireFly, Adobe Premiere Pro, and Adobe After Effects. All of these are in the Adobe Creative Cloud All Apps plan.
ChatGPT and AI text prompting in image editing
The Generative Fill tool requires the user to enter concise text prompts to get a desired response. But sometimes, it can be difficult to narrow down these prompts to what you actually want. ChatGPT, an AI-powered chatbot, can help you create detailed text descriptions for image generation. Such prompts can assist in enhancing your creativity and efficiency during image editing.
To illustrate, we asked ChatGPT to generate ten prompts for adding a classic car, clouds, and sun to our image. Here is the output.

In the above image, ChatGPT generated some of the prompts we can use to get our desired results. But ChatGPT isn’t perfect. As you can see, ChatGPT interpreted the request as generating individual images for the three items rather than adding all three items to one image. As a result, you should edit these prompts further to ensure they fit your use case.
Photoshop Generative Fill FAQ
Generative Fill is a relatively new feature in Adobe Photoshop. Here are frequently asked questions you should know to help you harness the power of this tool in your workflow.
How does Adobe's generative AI differ from other AI technologies in image editing?
Adobe’s generative AI differs from other AI technologies in image editing because it has been tightly integrated into creative applications like Photoshop, Illustrator, and Premier Pro. Other types of generative AI, such as Midjourney and OpenAI’s DALL-E 3, are standalone applications.
What’s more, Adobe’s generative AI has more direct access to a user’s workflow. This means individuals can easily modify images in-app rather than exporting them to other platforms.
How can I improve the accuracy and quality of the generated fill?
Though the Generative Fill tool is incredibly powerful, you still have to write clear and concise prompts to get the best outputs. Here are other tips and best practices for achieving better results with the tool.
- The Generative Fill tool works better when high-quality content is used. Ensure that your images are of good quality.
- When using the Lasso tool and Rectangular Marquee tool, make an accurate selection of the image to improve the quality of the generated content.
- Always select a large area on your image to allow the tool to analyze the surroundings and produce relevant results.
How does the AI Generative Fill tool handle different file formats?
The Generative Fill tool supports a wide variety of file formats, including JPEG, PNG, BMP, and PSD. However, the contents of a file should be of high quality for the best results. Also, ensure that the images don’t have a lot of noise and distortion, which could otherwise interfere with the AI’s capabilities.
Level up with AI-enhanced Photoshop
Powered by AI models, Adobe’s Generative Fill tool is revolutionizing the image editing workflow. With simple text prompts, individuals can quickly add objects, remove undesired elements, and expand and enhance their images. Consider exploring Adobe’s generative AI tool to improve your photo editing and graphic design projects.
If you’re looking for experts to help you with creative tasks like image editing, Upwork can connect you to Adobe Photoshop experts to help you harness the power of AI and transform your workflow.
And if you’re a professional looking for work, Upwork can connect you to different Adobe Photoshop-related jobs to help grow your portfolio and earn you extra income. Get started today!
Upwork does not control, operate, or sponsor the tools or services discussed in this article, which are only provided as potential options. Each reader and company should take the time to adequately analyze and determine the tools or services that would best fit their specific needs and situation.

.avif)

Author Spotlight

Upwork is the world’s largest human and AI-powered work marketplace that connects businesses with independent talent from across the globe. We serve everyone from one-person startups to large organizations with a powerful, trust-driven platform that enables companies and talent to work together in new ways that unlock their potential.