How to Use Adobe XD for Web Design
Adobe XD is a useful tool for web design, and learning to work with it is an in-demand skill. Here’s a guide for both beginner and pro designers.

.png)
.avif)
Planning and designing a website is not an easy task. You must consider a wide variety of components like layout, color scheme, typography, and content.
Adobe XD can help you kickstart your design project and make web pages that are both attractive and functional.
Website design is a process where you must conceptualize, plan, and build a collection of files that electronically determine the layout, colors, fonts, structure, images, and other interactive features you’ll display for your website visitors.
Adobe XD allows you to streamline your workflow to quickly create prototypes, mockups, and wireframes for your web projects—and that's just the tip of the iceberg.
You can use Adobe XD in your design process to improve the user experience of your website or mobile apps. UI/UX design (user interface and user experience design) is about ensuring your visitors have a positive experience when they interact with your site.
In this Adobe XD tutorial, we look at how to use Adobe XD to make an amazing website. We’ll cover all the basics of page design to help you get started.
Top Adobe XD features
Adobe XD has many features and functions, but here are some of its most popular:
- Design tools for prototyping. Prototyping is a way to test your ideas before you start coding or developing your website on WordPress or another website-building tool. Adobe XD has an extensive set of design tools that make it easy to create prototypes for your website, plan your UI design, and more.
- Layout. The layout is the arrangement of the content on a page. In web design, the layout is often created using a grid system. Adobe XD has a built-in grid system you can use to create your layouts.
- 3D transformations. 3D transformations allow you to add depth and dimension to your designs. Adobe XD has an easy-to-use 3D transformation tool you can use for this purpose.
- Responsive design. Responsive design is a technique used in web design to create websites that look good and perform well on all devices. Adobe XD has a number of features that make it easy to create responsive designs for mobile and desktop usability.
- Transitions and animations. Transitions and animations add life to your designs. Adobe XD has numerous built-in transitions and animations you can use to add movement to your web designs.
These are just some of the features that make Adobe XD an essential tool for web design. The following sections go into more detail.
Using Adobe XD to make a website
Adobe XD is a top choice for web design due to its simple, straightforward, and responsive nature. Whether you’re an experienced web designer or someone just getting started, Adobe XD is a great pick for you. Read on to learn more.
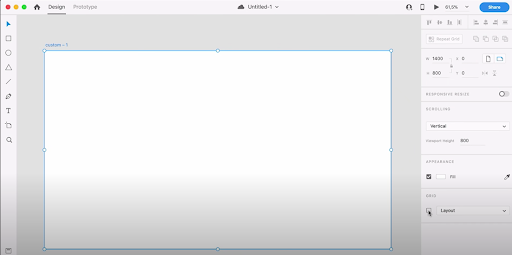
1. Create your artboard

Making a website starts with your artboard. Essentially, this is the project file for your website.
You have a few options here. You can select the website artboard template (pictured above) and pick the resolution. Note, however, that while these sizes are standards, they aren’t always the best choice.
Adobe XD forums record a lot of debate about the perfect size for website design, but most website builders agree the Adobe XD defaults are too large for the average desktop computer.
We suggest going with a custom size of 1400 x 800.

Simply enter the 1400 W and 800 H in the Custom Size area to create your artboard. This will give you the right size for your page design.
Press enter to create your artboard.
2. Familiarize yourself with the tools
Let’s go over some of the basic tools. If you’ve worked with Adobe software, like Photoshop or Illustrator, most of these tools will be familiar.

The left panel has a selection tool and square, circle, triangle, and line tools. You also have the pencil tool for making freeform lines and shapes, a familiar tool if you’ve used Photoshop in the past. There is also a text tool, indicated by the capital T.
On the top of the page, you have your Design feature and a Prototype feature. We will discuss the Prototype feature toward the end of this tutorial. For now, we will focus on the Design feature to create our page design.
Controls are on the right panel. If you click on a specific item or element in your design, you will use this panel to control it.
Mac users can zoom in with the command button + scroll, and Windows users can use Ctrl + scroll. Laptop users can use the trackpad to zoom. You can also use the magnifying glass tool on the left panel to zoom in to a specific point on the canvas. This will help you work on small page details, zoom out to see the big picture and ensure everything is legible and the right size.
Move around your artboard by holding the space bar.
3. Prepare your grid
Adobe XD has a number of guide tools to keep your elements aligned. When designing a full website, you’ll want to use the grid tools to have a fixed layout and keep your element organized.
Check the Grid > Layout box and select a Layout (column) or Square (graph paper) option. The layout grid provides a column overlay on artboards (great for working with responsive web or email layout applications).
The number of columns, width, and color is customizable to fit your needs. As the artboard is resized, the columns also adapt accordingly.
Set up your grid layout so the website content is in the middle with space on both sides.

We suggest starting with a gutter width of 1140 and a column width of 130. This will give you a good size for an average, modern website. Simply type in your number specifications in the fields and you’re ready to go.
4. Add your first image
Now, it’s time to start importing images and arranging elements. Setting up a folder with all of your assets before getting started will make the process easier.

Drag your images into your artboard and resize them to your desired size.
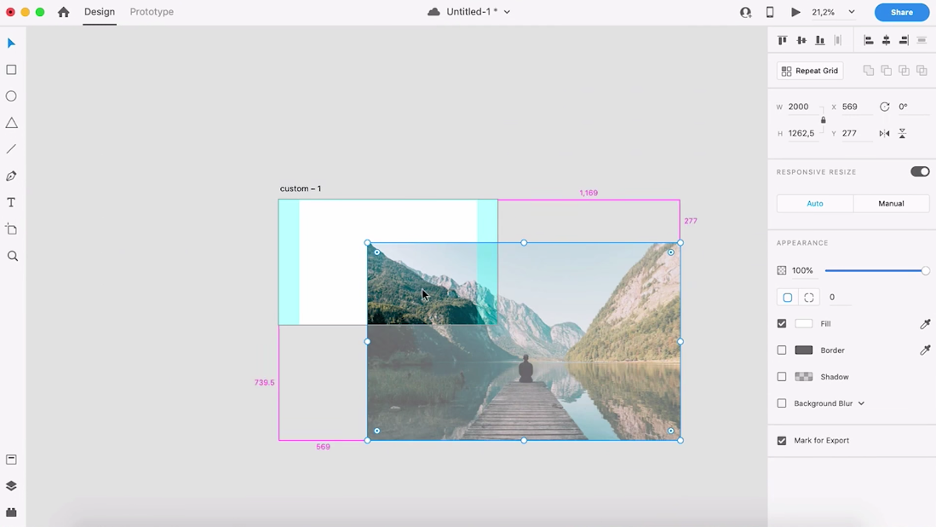
Use the automatic guides (blue lines) to help you align your image so it’s perfectly centered horizontally or vertically.

Once you have the image where you want it, lock it on your artboard so you don’t accidentally move it. Right-click your image and select Lock from the drop-down list.
5. Add your text
Now, it’s time to add text to your web page.

Select the type (text) tool on the left panel and type in your content.

Resize your text by placing your cursor on the box around it and dragging it in or out.
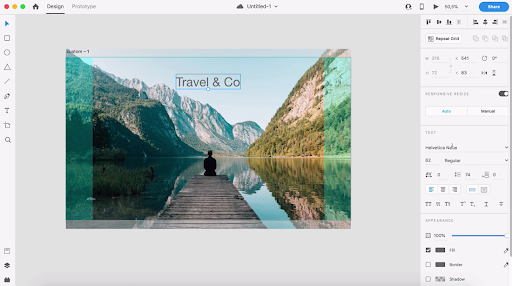
Change text settings on the right side panel under Text. You’ll see text size, font type, character spacing, colors, and more.
Add text to your navigation bar, header, footer, etc., so you have a fully realized web design when you finish.
6. Add all your elements to complete your layout
Now that you understand the basics of adding images and text, you can continue to add elements until you have everything you want on your web page. We made a homepage as an example.
Because we made a homepage, we added social icons. Be sure to use vector images (.svg files) so you can resize them without losing resolution. You can use the alignment tools at the top of the right column to line them up perfectly.

You can add more text, images, and even shapes to complete your homepage design. For example, we used the rectangle tool (with rounded corners) to create a sign-up button on our homepage example.
Uncheck the Grid > Layout option to see what your page looks like without the grid visuals.
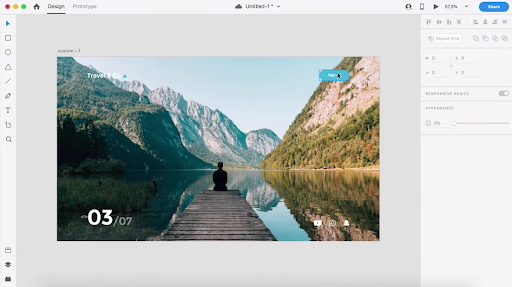
7. Use the prototype tool to add transitions and movements
Now that we’ve covered the basics of page design on Adobe XD, let’s dive a little deeper and discuss the Prototype feature.
The Prototype feature allows you to create more advanced features on your website (e.g., animations, transitions, movement) in an interactive, real-time preview. This lets you see a dynamic, interactive version of your design to test and share with teammates for review.
You can use the auto-animate tool to make animations on your page.

Auto-animate by selecting your element and entering information into the Interaction panel. Here you can control what happens when you trigger different actions by clicking, hovering, etc. You can also customize how your website visitors will navigate from page to page.
Here is more of what you need to know about animation, according to Adobe.
- Select an option to trigger the animation. Options include Tap, Click, Hover, and more.
- Select Auto-Animate and select the actions you want to take. Click the Action + button to make a selection. For example, you could choose “Scroll to” for the website to automatically scroll to a section farther down the page.
- Pick a destination to determine where the interaction takes you. For example, clicking “About Us” should redirect you to the About Us web page.
- You can also use the easing function to add easing effects (like Ease In or Ease Out) to create transition animations in your prototype.
Add a web page for every landing page on your website to complete your project, then use the Prototype tool to plan how everything will interact and connect. You can use a repeat grid to design faster and duplicate elements like drop-down lists for FAQs.
8. Get feedback
It’s time to have your teammates, friends, or stakeholders look at your design and give constructive feedback to improve the user experience.
It always helps to have a fresh set of eyes to give you a better idea of what can be improved, from both aesthetic and functional perspectives.
9. Make the handoff
Now that you’ve hammered out your final website design, it’s time to hand off your project to a website developer. You can also use other resources and tools to bring your design from Adobe XD to a real, live website.
Why you should use Adobe XD for web design
Adobe XD is a powerful and versatile tool for web designers. It offers a wide range of features for creating responsive websites that look great and perform well on all devices.
XD also makes prototyping designs easy, so you can test different ideas before committing to a final design. In addition, XD integrates with other Adobe products, such as Photoshop and Illustrator, making it a convenient tool for designers who already use Adobe Creative Cloud.
Here's what we love about it.
- Prototyping. Adobe XD's prototyping tools are second to none. With its easy-to-use interface, you can quickly sketch wireframe prototypes for your web projects, add animations, create transitions, and more. Create wireframe prototypes that viewers can click through and test.
- Agility. Adobe XD is a very agile tool. If you've used other Adobe software like Photoshop, you'll find it very simple. Because of the intuitive UI, you can accelerate your project and get things done faster.
- Integration. Adobe XD integrates seamlessly with other Adobe Creative Cloud products. This makes it easy to share your designs with other team members.
- Plug-ins. Adobe XD has a wide range of plug-ins to extend its functionality. There's also an extensive stock library.
- Easier handoff. Sharing assets with your web developer or graphic designer just got a lot easier. Adobe XD will help you streamline communication and complete your website project quickly.
- Great interface. The interface is clean and easy to use. The UI for the software itself is well designed, which also makes designing the UI for your own website easier.
Overall, Adobe XD is an excellent choice for any web designer who wants to create attractive and responsive websites quickly.
Know how to use Adobe XD? Work as a web designer
Do you know how to use Adobe XD? Are you a web designer looking for work?
Upwork can help you land an amazing web designer freelance assignment to put your skills to work.
With a plethora of registered independent professionals, Upwork is the place to connect with businesses and clients, take on new projects, and make money in a specialty field.
As a website or app designer, your skills are in demand. Many businesses need new websites or apps, and they're looking for designers like you to create them. Use Upwork to choose from a variety of web design jobs that fit your skill set and schedule. You can work with clients all over the world, on projects of all sizes, and get paid directly through Upwork.
Find web design projects and jobs today.
Upwork is not affiliated with and does not sponsor or endorse any of the tools or services discussed in this article. These tools and services are provided only as potential options, and each reader and company should take the time needed to adequately analyze and determine the tools or services that would best fit their specific needs and situation.

.avif)

Author Spotlight

Upwork is the world’s largest human and AI-powered work marketplace that connects businesses with independent talent from across the globe. We serve everyone from one-person startups to large organizations with a powerful, trust-driven platform that enables companies and talent to work together in new ways that unlock their potential.