How To Use Miro Assist for Creative Collaboration
Learn about the robust capabilities of Miro Assist for digital collaboration: its features, integrations, best practices, and impact on various job roles.

.png)
.avif)
With digital platforms that allow anyone to work from anywhere, collaboration is easier than ever—right? Well, as many teams and individual professionals know all too well, digital project management, presentations, and planning interactions come with their own challenges, like figuring out how to create project documents in real time during a video call.
The solution? An agile whiteboard platform that transforms productivity and workflows with artificial intelligence (AI). Miro AI features make real-time project management across digital workspaces easier.
In this article, we’ll break down how to use Miro Assist’s whiteboard features such as virtual sticky notes, mind maps, and widgets. We’ll also explore the use cases of each tool to optimize your productivity and creativity.
What is Miro Assist?
Miro Assist—previously known as Miro AI—is a real-time, interactive whiteboard collaboration tool available on desktop (Windows and Mac), mobile devices (iOS and Android), and interactive displays (Windows). The tool lets users communicate ideas, organize materials, and break down complex information without the time and resources needed to create visuals from scratch.
The stand-out feature of Miro Assist is its artificial intelligence integration that uses machine learning to create high-quality outputs to user prompts. Miro Assist uses multiple generative AI models, including its own proprietary software and Microsoft Azure OpenAI. The brainstorming and visualization power of AI enhances productivity, project management, and collaboration in digital workspaces.
Project managers can use this platform for communicating project plans and brainstorming. For example, for user experience (UX) designers, Miro Assist has user story mapping and a sequence diagram template for laying out usage scenarios and designs. With Miro Assist’s AI image generation, graphic designers can save time when creating sample images for projects.
For a breakdown of more ways you can use Miro Assist in your projects, check out our article “What Is Miro Assist?”
Miro’s servers are located in the EU and any data you or your team upload through the platform adheres to some of the most stringent data security and privacy laws in the world. They follow all the necessary regulatory requirements and industry best practices. Importantly, the data you submit is used only to provide an answer to your prompt and not for any other purpose, including further training of their AI models.
Because of these security measures, you can feel confident using Miro Assist across your distributed teams, especially if you’re a large company using the Enterprise plan and its advanced functionality.
How to use Miro Assist
To get started with Miro Assist, go to Miro.com and make an account. You can start with a free plan to get a feel for Miro’s functionality, but Miro Assist users on the free plan are limited to creating three editable Miro boards at a time. Free plan users can create more than three Miro boards, but older Miro boards will be in view-only mode unless you upgrade your plan.
Once you’ve set up your Miro account, you can access your dashboard.

This is the main workspace for your Miro account that shows your created Miro boards, team information, and Miro board templates. For more options, click on Miroverse on the left-hand toolbar to use templates created by other Miro users.
Miro board basics
From the Miro Assist homepage, you can use a recommended template or a blank one. Here’s an overview of Miro board navigation:

The main menu hamburger is located on the top left toolbar, along with your board title and settings, export tool, and search tool.
The context menu is the toolbar for a specific design element. Access an element’s context menu by clicking on the element.

The creation menu is the vertical toolbar on the left. This is where you’ll find the select tool, templates, text boxes, sticky notes, and shortcuts for the most recently used app and more apps.
Underneath the creation toolbar are the “undo” and “redo” buttons. At the bottom left is the sidebar icon that gives access to board history, presentation frames, and activities (voting, timer, and video calling).
These activities are also accessible from the “apps” toolbar at the top center of the Miro board. Note that Miro Assist’s activities are only available to paid plan users.
Access Miro Assist’s AI tools through the context menu generated by clicking on a template design element or through the Command palette. To open the Command palette, type CMD + K (Mac) or CTRL + K (Windows), or go to the main menu and select Command palette.

The Command palette:

To use AI tools to generate an entire element through a prompt, access Miro Assist through the Command palette. Enter a prompt, and Miro Assist will do the work for you.

If you want to fill out the template and use AI for more specific tasks, access Miro Assist through the Context menu. Select an element on your board, then click the Miro Assist icon to use AI for that specific element, such as generating an image from text or generating similar items.

Mind mapping
Miro Assist’s mind maps have the brainstorming functionality of a traditional whiteboard mind map but with the ease of a virtual tool. The mind map starts with a central topic, which is expanded through tiers of connecting ideas. This template is helpful for problem-solving and planning.

Once you enter your main topic, you can jump to connecting blanks using the Enter key.
Miro Assist makes brainstorming and problem-solving even easier by automatically expanding bubbles with questions, ideas, or topics.
How to use Miro Assist in mind maps:
From the context menu:
1. Create a mind map on a Miro board by selecting More apps on the Creation toolbar or the Command palette.
2. Type your topics into each bubble, pressing Enter to create a secondary bubble or clicking the plus sign to add another connecting bubble.

3. Choose a connecting bubble, then go to the context menu and choose Miro Assist (the blue square icon with sparkles).
4. You can select Expand with questions, Expand with ideas, or Expand with topics.
5. Artificial intelligence will create new bubbles with the requested output. To save them, click Keep. You can also choose to Try again or Discard the results.

From the Command palette:
1. To open the Command palette, type CMD + K (Mac) or CTRL + K (Windows), or go to the main menu and select Command palette.
2. Choose Generate mind map.
3. Either input a prompt or use a ready-made suggestion.
4. To save your generated mind map, pick Keep. You can also Try again or Discard the results.
We made a product problem-solving mind map using the topic “scooter wheels getting stuck” and the secondary topic “tire materials.” Then, we used Miro Assist to generate ideas.

Sticky notes
Digital sticky notes lay out your thoughts with ease. Miro Assist goes a step further by offering multiple sticky note templates to meet your needs, such as color-coded groups, sticky note tables, and sticky note funnels for expanding or narrowing down ideas.

By selecting multiple notes, Miro Assist can summarize information into a single note or cluster notes by keyword or sentiment. This feature lets users organize brainstorming ideas, identify main topics, and pull out the most relevant suggestions.
Miro Assist can also generate related notes from selected notes, which aids in brainstorming. If you want to visualize an idea, Miro Assist can even create images related to selected notes.
How to use Miro Assist in sticky notes:
From the context menu:
1. Click on a sticky note.
2. On the context menu, click the Miro Assist icon.
Click Add similar sticky notes, Generate image, Cluster by keyword, or Cluster by sentiment

3. If you need to expand the board view, click Go to results.
4. You can either Keep, Try Again, or Discard the results.

From the Command palette:
1. To open the Command palette, type CMD + K (Mac) or CTRL + K (Windows), or go to the Main menu and then click Command palette.
2. Select Generate sticky notes.
3. Input a question or topic, or use a smart suggestion.
4. Your sticky note will appear on the template. To save, select Keep.

To summarize multiple sticky notes:
1. Drag your cursor to choose the sticky notes you want to use.
2. At the context menu, select Miro Assist.
3. Choose Summarize sticky notes.
4. Once your summary is generated, it will appear on the template.

For example, we brainstormed ideas for a holiday car commercial and asked Miro Assist to summarize them as shown on the yellow sticky note.

User stories
Miro Assist’s user stories template takes the setup time out of user story mapping. With AI functionality that automatically generates user story cards, you can spend more time refining your products to meet consumer needs.

This template starts with your user persona. Rows of sticky notes map user activities, user tasks, and user stories according to each product release.
To use Miro Assist’s AI features, follow the sticky notes steps. To group user stories, click on an empty space in the Miro board and drag your icon to select the stories you want to include. Then, click Miro Assist, and choose Cluster by keyword or Cluster by sentiment in the context menu.

For another template with user story cards, go to the creation menu, click More apps, and select User story mapping.
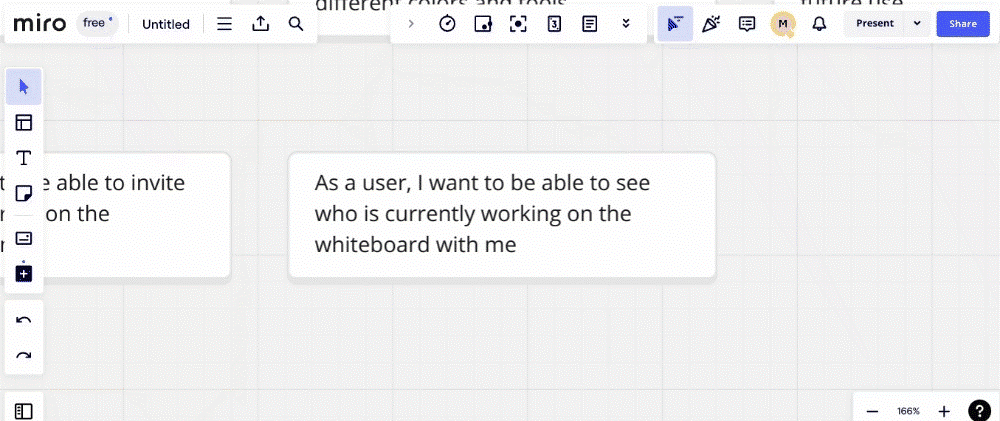
We used Miro Assist to generate more cards with user stories from our user story map about ordering pizza.

To generate user story cards, follow these steps:
From the context menu:
1. From the Creation toolbar (the vertical menu on the left), click More Apps and then Card, or use the search bar.

2. Type your prompt into the card using this format: As a (type of user), I want (goal) so that (outcome).
3. On the context menu, select Miro AI.
4. Go to Generate cards with user stories.
5. To save the generated user story cards, click Keep.

From the Command palette:
1. Open the command palette by typing CMD + K (Mac) or CTRL + K (Windows), or go to the main menu and click Command palette.
2. Select Generate cards with user stories.
3. Type your user story prompt using this format: As a (type of user), I want (goal) so that (outcome). Or use a recommended prompt.
4. Your user story cards will appear on your board.
How to add acceptance criteria to cards:
1. Select a generated user story card.
2. On the context menu, select the Miro AI icon.
3. Choose Add acceptance criteria to this card.
4. The acceptance criteria will be added to the card as a list.
Sequence diagrams
Need to break a process into its steps? Miro Assist’s AI-generated sequence diagrams automatically lay out the chronological order of user interactions in design mapping and usage scenarios, saving you time and energy.
Sequence diagrams can only be created using a Miro Assist prompt, but its customization functionality lets users adjust the diagram as needed.
We used Miro Assist’s smart suggestions to create a sequence diagram for “payment processing.”

How to create sequence diagrams:
1. Open the Command palette by typing CMD + K (Mac) or CTRL + K (Windows), or go to the main menu and select Command palette.
2. Underneath the Miro Assist subheading, select Generate sequence diagram or type it into the search bar.
3. Prompt Miro Assist’s AI with the topic of your sequence diagram, or use a suggestion.
4. Your sequence diagram will appear on your board.

Miro Assist best practices
Miro Assist is an AI tool and relies on human direction to create the best solutions for your needs. When using artificial intelligence, be sure to fact check generated outputs and edit them for tone, clarity, and style. While AI can speed up many processes in design, development, and ideation, it can also output biased or incorrect information, or generate low-quality outputs.
Make the most out of Miro Assist by following these tips.
Use smart suggestions
No one likes performing repetitive tasks, as it wastes valuable time and energy. With Miro Assist, you don’t have to dig through menus for the right tools—it will automatically suggest what you need.
Miro Assist’s smart suggestions use data from previous user interactions to make the interface as intuitive as possible. Smart suggestions recommend tools, suggest relevant design elements, and give content recommendations.
For example, if you’re creating a sequence diagram, Miro Assist will automatically recommend different prompts to get you started.
Document your process
With tools like Miro Assist, creating documents that detail your internal processes is easy—but remembering to update this information isn’t as straightforward.
By continually reviewing and updating process documentation, you make sure the information distributed to your teams is accurate, effective, and scales with your business.
For example, if you used Miro Assist to create sequence mapping for your candidate interviewing process, you’ll need to update this document as your HR team grows and new steps are added.
Using Miro’s board history, you can keep tabs on the last time important documentation was updated.
Integrate external tools
If you’re collaborating across multiple digital workspaces, you’re likely using more than one platform. Miro Assist’s integrations enhance your workflows by making these tools accessible.
With the Microsoft Teams integration, you can create Miro boards during Teams meetings. The Azure DevOps integration with Miro lets users create and edit Azure cards from a Miro board. Additionally, Miro Assist’s integration with ChatGPT gives users the power to turn their text into flowcharts and diagrams.
Embrace the future of workforce collaboration
Miro Assist is an agile and intuitive AI interface that can help you communicate better, work faster, and create a more organized workspace. After all, digital clutter is still clutter!
If you want to get even more out of Miro Assist’s functionality, find independent talent on Upwork who can add their expertise to your project management, UX design, and graphic design projects.
If you’re an independent professional looking for opportunities to leverage your skills, use Upwork to find project opportunities in project management, UX design, graphic design, and more.
Upwork does not control, operate, or sponsor the tools or services discussed in this article, which are only provided as potential options. Each reader and company should take the time to adequately analyze and determine the tools or services that would best fit their specific needs and situation.

.avif)

Author Spotlight

Upwork is the world’s largest human and AI-powered work marketplace that connects businesses with independent talent from across the globe. We serve everyone from one-person startups to large organizations with a powerful, trust-driven platform that enables companies and talent to work together in new ways that unlock their potential.